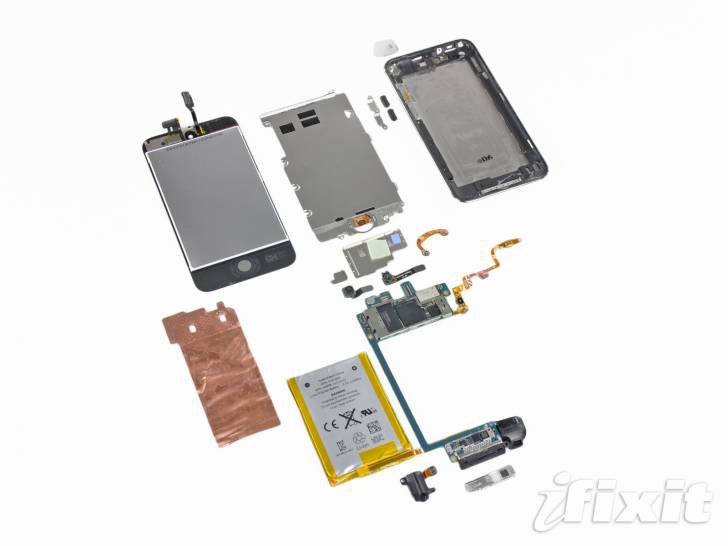
iFixit은 새 iPod 터치를 분해했고, 분해 결과를 자사 사이트에 실었다. 분해로 인해 새로 나타난 사항들은 아래와 같다.
- 새 iPod 터치는 하단부에 눈에 띄는 스피커 그릴이 있다.
- 새 iPod 터치의 레티나 디스플레이는 전원을 껐을 때 거의 완전한 블랙을 보여주고 있지만, 이전 iPod 터치는 다크 그레이를 보인다.
- 후면 카메라는 iPhone 4의 5 메가픽셀에 비해 0.7 메가픽셀을 제공한다.
- 전면 카메라는 iPhone 4와 동일하다.
- 배터리 용량은 3.44 Wh이다.
- 새 iPod 터치 디스플레이는 두께가 2.93mm로 iPhone 4의 3.05mm보다 얇고, iPhone 4에 채용된 IPS 패널이 아니다.
- 새 iPod 터치는 iPhone 4와 iPad과 같은 A4 프로세서를 채용했고, 프로세서 패키지는 iPad과 동일한 K4X2G643GE
이다. 따라서 램 용량은 256MB로 나타났다.
[소스] http://www.ifixit.com/Teardown/iPod-Touch-4th-Generation-Teardown/3562/1
---------------------------------------------------
[원문]
iPod Touch 4th Generation Teardown
We are ecstatic to finally have the opportunity to disassemble an iPod touch with a camera and not just an empty camera slot.
This is one of three iPod teardowns this week! We're also taking apart the new iPod Nano, and we took apart the new Shuffle yesterday. Stay in the loop on twitter for the latest teardown shenanigans.
In case you missed it, last week we celebrated a major milestone. In addition to enabling Apple repair, we now have parts and repair manuals for most game consoles! We decided to celebrate by taking a trip through time and ripping apart five retro consoles.
Shameless plug: We fund teardowns like this by selling iPod Touch Parts! We've also got free open-source repair manuals for every iPod Touch but this one, and we're working on that.
Tools

 Edit Step 1 — iPod Touch 4th Generation Teardown
-
We've got the new iPod Touch in hand!
-
The feature set of the new Touch is suspiciously similar to the iPhone 4:
-
640 x 960 pixel resolution retina display
-
Rear-facing camera with 720p video recording
-
Front-facing camera with VGA video recording
-
802.11b/g/n Wi-Fi
-
FaceTime video chat
-
Three-axis gyro
-
Edit Step 2
-
The new Touch has a visible speaker grill on the bottom (to the left of the dock connector). On previous iPod Touches, the external audio simply came out the dock connector. Apple likely beefed up the speakerphone to enable FaceTime on the Touch.
-
The new Touch has once again been slimmed-down. Similar to the iPhone 4, the back of the Touch is now flat. Unlike the iPhone 4, the iPod Touch still features the same shiny aluminum back that has graced every iPod Touch.
-
We paid $229 for our 8 GB Touch, which seems like a pretty good deal. A 32 GB Touch will set you back $299, and a 64 GB can be had for $399.
-
Bogus math: In dollars per gigabyte, the 8 GB Touch is a terrible deal: $28.63/GB. With the 64 GB Touch a gigabyte will only cost you $6.23.
-
Want bogus logic to go with our bogus math? BusinessWeek has a fallacious column up on how the iPod Touch costs $29 more than the iPhone 4.
Edit Step 3
-
The new Touch (right) with its retina display doesn't look exceptionally remarkable in this shot.
-
The retina display features a resolution of 640x960. Compared to the previous Touch (320x480), that's twice pixels in each direction, or four times the total pixels.
-
The retina display is almost completely black when turned off. That's noticeably different from the display of the earlier iPod Touch (left), which is dark gray when turned off.
Edit Step 4
-
Cameras!
-
That's right folks, at long last the iPod Touch has not one, but two cameras.
-
The front-facing camera is just like that of the iPhone 4, with support for VGA quality photos and video.
-
Unfortunately, the rear-facing camera is only 960x720 resolution. That's only about .7 megapixels, compared to 5 megapixels on the iPhone 4. It's likely that Apple had to sacrifice still photo resolution in order to squeeze the camera into the Touch's slim package.
-
There's a microphone hole next to the rear camera. Apple's updated the audio input and output prowess of the new Touch to enable it to play nice with FaceTime.
Edit Step 5
-
Enough of the exterior, let's get inside...
-
There are no visible screws. We'll have to figure out what combination of glue, tabs, and magic Apple used to hold the Touch together.
-
We first used a heat gun to soften the adhesive holding the display assembly in place.
-
Next, we ran a iPod Touch opening tool around the edge to separate the adhesive.
Edit Step 6
-
That was the easiest iPod Touch we've ever cracked open. Hopefully the insides will continue to be repair-friendly.
-
Dear iFixit: this is Future iFixit and we can confirm that the insides are not repair-friendly.
-
-
The display assembly is still attached to the iPod, and disconnecting it doesn't look like it's going to be easy.
Edit Step 7
-
Like the iPhone 4, it appears that the front glass and LCD panel are permanently fused together. The good news is that this will prevent dust from getting beneath the glass, but unfortunately it will make repair more expensive.
-
There are two cables securing the display assembly to the logic board. One is easy to disconnect, but the other is more challenging. The thin black cable connects beneath the logic board. That means that replacing the display assembly will definitely not be trivial.
-
If you have a 1st, 2nd, or 3rd generation Touch, it is possible to replace just the front glass without replacing the LCD.
Edit Step 8
-
There's an EMI shield between us and the iPod. Fortunately, it's just held in place with a few Phillips #00 screws.
-
The EMI shield is surprisingly heavy, weighing in at 11 grams. The entire iPod Touch is only 101 grams, meaning Apple has devoted more than 10% of the iPod's weight to this metal EMI shield.
Edit Step 9
-
After removing the EMI shield, the battery looms large.
-
Apple claims you'll get (up to) 40 hours of audio playback. That's a long time!
-
Apple's making us do some digging to find the chips. This side of the logic board is quite barren.
-
Contrary to Apple's initial claims on their FaceTime marketing page, the iPod Touch does not have a vibrator. Apple's website has been updated to remove this claim.
Edit Step 10
-
The battery lists a capacity of 3.44 Watt-hours.
-
Like all other revisions of the iPod Touch, the battery is soldered to the logic board. This isn't a surprise given the slim form factor of the iPod, but we wish Apple would make battery replacement easier.
-
Fortunately, compared to the 3rd Generation Touch, Apple did add more space between the battery's three solder points (on the orange ribbon just to the left of the battery). This should make the soldering job a little easier when replacing the battery, as there's less chance of accidentally bridging the contacts.
Edit Step 11
-
In a first for the iPod Touch line, the headphone jack is not soldered to the logic board.
-
There's one screw, one connector, and the headphone jack lifts out.
-
Having the headphone jack on a separate board is definitely a plus for repairability.
Edit Step 12
-
Here's the headphone jack all by itself. Notice the liquid damage indicator on the bottom of part.
-
The headphone jack is stamped with Foxconn. Foxconn has long been one of Apple's primary contract manufacturers and this part has one of the few indications that Apple doesn't actually manufacture the iPod.
Edit Step 13
-
It took a bit of prying to lift the battery and logic board out of the casing, but unfortunately the headphone/sleep button control ribbon cable is both soldered to the logic board and glued to the outer case.
Edit Step 14
-
After wrangling the logic board/battery/display assembly out of the rear panel, we can finally access the screws holding the volume button cover and the sleep button down.
-
After a good bit of anxiety-filled scraping with a metal spudger, the ribbon cable is finally free from the rear panel.
-
The control ribbon cable is bonded to the rear panel extremely well, especially near the volume buttons. Since the volume buttons have no structural bracket (just a steel cover) holding them to the rear panel, the adhesive bond must be strong enough to survive presses from the strongest of button pushers.
-
Edit Step 15
-
After removing a loop of copper tape around the digitizer connector, the display assembly can finally be separated from the logic board.
-
A copper shield fastened to the back of the battery can also be removed at this point.
-
Presumably, the rear case is thin enough to warrant a copper shield for either heat dispersion or EMI protection, or both.
-
Edit Step 16
-
The display assembly of the Touch measures 2.93 mm thick. That is slightly thinner than the 3.05 mm iPhone 4 display, and 30% thicker than the 2.27 mm display on the new iPod Nano.
-
The retina display on the 4th generation Touch is rumored to be lacking IPS, differing from the display installed in the iPhone 4. A way to test the difference is to examine an identical image on both devices at an extreme viewing angle. As seen in the second picture, the Touch (bottom) loses a great deal of contrast when viewed from a low angle.
Page 3 of 3
Edit Step 17 -
At this point, the rear facing camera can be disconnected from the logic board.
-
Unlike the iPhone 4, the fourth generation Touch's rear-facing camera does not support autofocus and is a much lower resolution.
-
For those of you who are wondering, there's no way the iPhone 4's rear camera can be installed in the Touch without some extreme hackery.
-
-
This camera is 6.5 mm square by 3.3 mm tall. That is dramatically smaller than the iPhone 4's rear camera.
-
Just above the rear camera, the cylindrical silver object is the microphone, a new feature for the iPod Touch line.
Edit Step 18 -
The front-facing camera is readily accessible and can be disconnected from the logic board at this point.
-
Unsurprisingly, it looks just like the iPhone 4's front-facing camera.
-
We're not surprised: they have the same resolution.
-
-
This camera is 4.9 mm square and 2.5 mm thick, slightly (0.3 mm) thinner than the iPhone 4's front facing camera.
Edit Step 19 -
Next, we disconnected the Touch's singular external antenna.
-
This antenna is presumably used for Wi-Fi reception and is situated near the front glass panel when the Touch is completely assembled. Its new location eliminates the need for the plastic "window" found on the 3rd generation Touch.
Edit Step 20 -
Finally! We found some serious chips.
-
This iPod features the same A4 processor that's found in the iPad and iPhone 4.
-
The key marking of interest on the A4 processor package is K4X2G643GE. This is identical to the marking found on the iPad processor, but different from the iPhone 4 processor. The iPad has 256 MB RAM, while the iPhone 4 features 512 MB. Unfortunately, this means that like the iPad, the new iPod Touch includes only 256 MB of RAM.
-
And no, there's no RAM upgrade slot.
Edit Step 21 -
There are a few more chips at the other end of the logic board.
-
On the far left is a 338S0859 chip. It's similar to the Cirrus Logic audio codec of the iPhone 4 (338S0589).
-
There are a few other chips, namely the AGD8 2032 and 2032 33DH, which can also be found on the iPhone 4.
-
-
You can clearly see the 30 pins of the dock connector, located just below the row of chips.
Edit Step 22 -
The iPod Touch now has a legitimate speaker, although we doubt it'll satisfy many audiophiles.
-
Apple appears to be routing the audio out not only the newly-added speaker grill (large hole), but also out of the dock connector (small hole).
Edit Step 23 -
What's this? Empty space?
-
We don't know what this white plastic piece does other than take up space. Perhaps it's a weight-saving device.
Edit Step 24 -
iPod Touch 4th Generation Repairability: 4 out of 10 (10 is easiest to repair)
-
Good: Opening the device is pretty straightforward, as long as you have a heat gun and some iPod Touch opening tools handy.
-
Good: The headphone jack is not soldered to the logic board, a first for the iPod Touch line.
-
Bad: The front glass and LCD are permanently fused together, increasing the cost of repairing broken front glass.
-
Bad: Removing the display completely requires removing the logic board
-
Bad: Apple soldered the volume button and sleep button cable to the logic board. The previous Touch had a ZIF connector. This makes removing logic board very difficult.
-
Bad: The battery is still soldered to the logic board, just like previous models.
-
'(前)오래된자료 > IT정보(뉴스)' 카테고리의 다른 글
| 안드로이드용 Skype 어플리케이션 드디어 출시! (동영상) (0) | 2010.10.08 |
|---|---|
| Potokina 2010: Pentax K-5, Optio RZ10 사용기 (0) | 2010.09.28 |
| 하이엔드 컴팩트 디카의 왕좌를 가린다. VLUU WB1000 VS. LEICA D-LUX4 (0) | 2010.09.03 |
| [중계] 애플 미디어 이벤트 2010(인가젯) (0) | 2010.09.02 |
| [리뷰] 아이폰4의 화려한 귀환? (0) | 2010.08.20 |


